Software
Immutable Drives In VirtualBox On Windows
2I have been playing with VirtualBox for the last day or so now, and I am very pleased with the way that it works so far. Feels snappier to me than VMWare did, but maybe thats just me 🙂
One of the more useful features I found in VirtualBox is immutable hard drives. These are drive images that never change, so to speak. Any data that is written is saved to another drive containing only changes, so if you have lots of VM images for many different projects (like I do) you don’t have to install an OS on each of them; Just make a differencing disk and only make it the size of the changed data (such as programs and updates etc.) Brilliant!
It took me a while to figure out how to make an immutable disk on Windows, as the GUI is not very friendly towards this process. You should start by making a new Virtual Machine with the desired OS (I used Windows for the time being) and create a new hard drive image for it. From that VM, proceed to install Windows as you normally would do, activate it and install all your Windows updates and tools you wish shared to your multiple machines. For me, this is mostly just Windows, all the updates, and Altap Salamander.
Once this process was done, I proceeded to delete all temporary files from the system, a bunch of un-necessary Windows files, and ran a defrag on the drive using PerfectDisk to make sure everything was at it’s peak performance.
In order to make the drive immutable, we have to perform several steps to it. Firstly, I compressed the VDI image to make sure the file was as small as possible. While cloning will do this for us as well (described later) I wanted to keep the original image small in case I needed it for something else in the future. VirtualBox is great in that you can control it via the command line. Open a Command Prompt and change the folder that you installed VirtualBox and run the VBoxManage command with the modifyhd command, followed by the VDI file and the compact command:
This may take a few minutes to complete, but if the file has lots of empty space in it, that will all disappear after the process is complete. Next, we will make a clone of the disk. Again, I chose to do it this way so I could keep the original for something else in the future. Cloning a drive is very simple to do, using the clonehd command and the filename of the source VDI, and a filename of a target VDI. Cloning is an important step, as VirtualBox won’t allow you to use the same VDI file copied to multiple locations, the cloning process changes the internal drive GUID so that the clone can be added as a seperate drive. In VMWare in the past, i’d have huge VMDK files that I would just copy to a new VM and launch from there, which also resulted in much larger files being used than what was actually necessary. I cloned the drive using the following command:
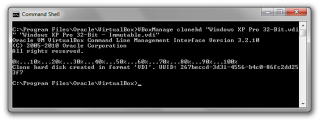
VBoxManage clonehd "Windows XP Pro 32-Bit.vdi" "Windows XP Pro 32-Bit - Immutable.vdi"
Which will produce a new VDI file that we will use with our future VM’s:
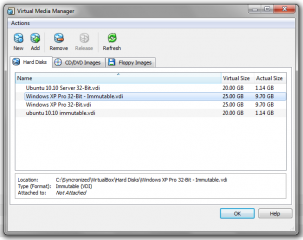
If you go back to the Media Manager in VirtualBox, click on Add and add the newly created VDI file to the list of volumes. Everything should match except for the name. The next step is to mark this as an immutable drive, so VirtualBox recognizes it as such. This is done with the modifyhd tag as follows:
VBoxManage modifyhd "Windows XP Pro 32-Bit - Immutable.vdi" --type immutable
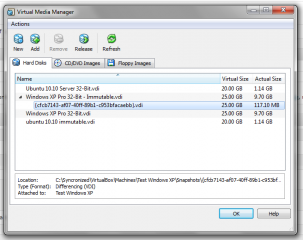
And if you refresh your Media Manager folder, you will see that the drive type is now set to immutable:
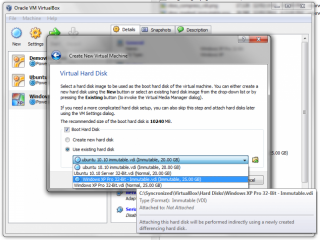
So, now that we have an immutable drive we should probably try and use it 🙂 To do this, simply go back to the VM management and create a new Virtual Machine for Windows as you did before. Now when you get to the part where it asks about the Hard Drive, choose an existing drive and select the Immutable image, You will notice that it has a blue spot next to it, signifying that it’s immutable:
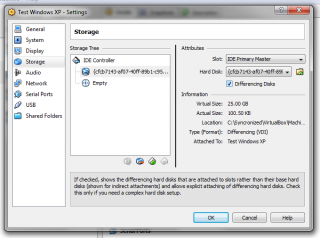
After the VM is created, click Settings and go to Storage, select the Immutable drive and place a checkmark in the box for differencing. This will cause a new hard disk name to appear. Click OK to accept the changes, then launch the VM. It will boot to the same way as it did before, except its not using the old image. Make sure it boots OK then go ahead and shut down the VM so we can make some changes.
Some Notes About Differencing
Typically, drives that use differencing disks will “forget” the changes made to them once the VM is restarted. This is the case here by default, once you boot with a differencing disk, any changes made will be lost when it shuts down. This protects the original disk, and prevents anything from changing in it. Its always easy to see which VM’s use immutable drives, if you go to the Media Manager there will be an expandable arrow next to the main drive, which contains all the differencing disks from the various VM’s that use that specific immutable drive.
Differencing disks can be changed to allow them to retain their changes after the VM shuts down. In the console, simply run the following command (exchanging the GUID for the one found in your media manager) :
VBoxManage modifyhd cfcb7143-af07-40ff-89b1-c953bfacaebb --autoreset off
The filename should match the GUID and is located in the Virtual Machines folder/{Machine Name}/Snapshots folder. Mine is {cfcb7143-af07-40ff-89b1-c953bfacaebb}.vdi respectively.
After that, any changes written to the disk will remain permanent! I hope this helps someone out there with a similar situation, and that this helps then understand it a little better 🙂
Recent Experiences With VirtualBox – Better Than VMWare :)
0I would like to thank my friend bpoint for getting me into using VirtualBox instead of VMWare, I am already finding it far more useful and saved considerable amounts of disk space 🙂
VirtualBox is a virtual machine system that allows you to install additional OS’es into virtual machines, including Windows, Linux, and even Mac!
Im sure I will blog about it more when I learn how to use it properly and all that good stuff 🙂
Win32 – SDL Loses Sound When The Main Window Loses Focus – Fix
0So, I ran into an interesting problem this week while working on the “Alien Invasion” music disk that causes all sound to be disabled when the main SDL window would lose focus or become hidden. This could be a bit of a problem for a music disk, so I looked into trying to figure it out for myself.At first I tried the usual SDL culprits, which are the event system for handling focus, but no luck there.
After some poking around in the SDL source code, I was finally able to find a fix. In SDL_dx5audio.c you can change the following function to read:
void DX5_SoundFocus(HWND hwnd)
{
    // This makes sound audible regardless of focus being lost
    //mainwin = hwnd;
}
A better solution long-term in SDL will be to have an option to do this, rather than having to change the code, or just have this enabled by default. We’ll see! This was tested on 1.2.14 which is available to download from http://www.libsdl.org Hopefully someone else can find this useful too 🙂
Converting Databases To UTF8 Format From Latin1
1I have been putting off the inevitable the last couple of weeks, which was the task of converting the database for CVGM.net to UTF8 from the default collation of latin1-swedish-ci. I am not the best when it comes to administering MySQL via command script, and phpMyAdmin didnt do the job properly of conversion for me. After a bit of googling, I found a bash script at islandlinux that was able to help me out considerably:
#!/bin/bash

DATABASE=$1

if [ ! "$DATABASE" ]; then
echo "Please specify a database"
exit
fi

BACKUPDIR="/root/tmp/mysql_backups/"

if [ ! -d "$BACKUPDIR" ]; then
mkdir -p "$BACKUPDIR"
fi

BACKUP="$BACKUPDIR""$DATABASE.sql"

mysqldump --add-drop-table --extended-insert "$DATABASE" > "$BACKUP"

TABLES=`mysql --batch --execute 'SHOW TABLES' "$DATABASE" | grep -v "^Tables_in"`

for TABLE in $TABLES; do
echo 'ALTER TABLE `'"$TABLE"'` CONVERT TO CHARACTER SET utf8 COLLATE utf8_general_ci;';
# uncomment the following line to process the commands
#mysql --execute 'ALTER TABLE `'"$TABLE"'` CONVERT TO CHARACTER SET utf8 COLLATE utf8_general_ci;' "$DATABASE"
done
This script converted the database tables and everything under it to the correct format. It also backs up the databases first in case something decides to take a crap on you. The problem I had with phpMyAdmin was even though I changed the collation to utf8_general_ci it didn’t do it recursively into the tables and the fields underneath it.
Thanks for the script guys 🙂 You saved me even more work!
Automatically Restarting Apache2 Via Cronjob If It Crashes
0I have been having an issue with my trac server that causes random apache2 crashes, and as of late I haven’t been able to figure out exactly what is causing them, seems the server just seems to automagically turn off at random intervals.
This is a script I put together to test if any of the apache2 executables are currently running:
#!/bin/sh
run=`ps ax | grep /usr/sbin/apache2 | grep -v grep | cut -c1-5 | paste -s -`
if [ "$run" ];
then
echo "Apache2 is running"
else
/etc/init.d/httpd start
fi
The script checks to see if they are, and if it can’t find any running tasks it will attempt to restart apache2. Install this to a crontab every couple of minutes, and it should cause Apache to auto-restart in the event of a crash. Works well on the trac server anyways 🙂
NOW! Amstrad CPC Music Disk Released At Main Party 2010
1 NOW! is a music disk I have been working on in collaboration with Ultrasyd and Fenyx Kell for the Amstrad CPC 128K system. The music disk features 12 awesome music tracks, and was coded in a little over two weeks before I get settled into working on Zine again. This is my first production on the Amstrad (and also the first CPC project for Brainstorm) that was any good (as I did a bit of BASIC many moons ago), I have played with a friends system many years ago as a kid, but this is the first piece of code I have written on the system that hasn’t been utter shite. I am very pleased with the outcome of this project, and the music is amazing 🙂
I started working on this project on Sept. 13 with Ultrasyd, as the people who were supposed to write him a music disk had bailed out of the project. I took it on as a challenge, realizing the path would not be straight and easy, plus I have been looking for an excuse to get back into 8-bit development for quite some time 🙂
The project is written using Z88DK (available HERE) and uses C and Z80 Assembly language. I used CPCRSlib for some of the graphics code, mixed with a bit of my own dodgy code. The music replayer is by Targhan and available HERE.
There were many technical challenges on this project. The biggest was the small amount of RAM available to the system at any one time, certainly not enough to hold all the music let alone the program and the data it needed to run. At one point, I spent 2 solid days working on getting 5 tunes in and working without crashing the computer, when I realized a mistake I had made in some code earlier that would allow me to hold many more. So at around 4pm yesterday I was able to fit all 12 songs into the production without a problem. Nothing quite like a last second fix for a production thats due to be released the very next morning 🙂 Many thanks to Ultrasyd for staying up late on the CVGM OneLiner to get this thing finished in time for Main (and showing it off to the Amstrad community there). There is also a hidden, 13th tune 🙂
Download the DSK file Here. To run, insert the disk and type RUN “NOW!” to start the music disk. Up & Down arrow keys to change between music. Escape to quit. If you wish to run this in an emulator, I recommend using JavaCPC or WinAPE. This disk has been fully tested on real 6128 Hardware (Thanks again, Ultrasyd!).
Full Production Credits
Music: Ultrasyd/BRS and Fenyx Kell
Graphics: Yes/BRS (Loading Screen), Ultrasyd/BRS (Main Picture)
Code: FishGuy876/BRS
See the TXT file on the DSK/Zip for a full list of everyones greetings and thanks 🙂
EDIT: The music disk was entered into the Wild compo at Main and ranked in 3rd place!!! Fantastic! \o/ Congratulations to everyone again! It can also be found on Pouet now, where you can comment and rate it! Thanks!
Main Party 2010 – Working On A Project With Ultrasyd
0While I won’t be at Main Party this year, Ultrasyd will be, and to mark the occasion I am working on a project with him for some Amstrad CPC music he has written along with Fenyx Kell. We are putting together a music disk that will be released at the party, featuring my code and Ultrasyd’s music and gfx. This will be the first Amstrad CPC project I have work on in almost 16 years (and that was using BASIC code!).
The new disk will be written using the z88dk compiler, which turns raw C code mixed with assembler into Z80 code that can be used on the Amstrad, ZX Spectrum, and many other Z80/Z88 based computers. Its a very exciting project for me, as I have been itching to get into 8-bit development again for quite some time! I will post more on this project as it is released!
Using MorphOS Again For the First Time In Years!
0In the last week or so, I have been convinced to un-box my Pegasos II motherboard and boot it up to have a play around with it. It has been at least 3 or 4 years since I last even looked at the board, let alone turned it on. I got the board when I was employed with Epic Interactive, as I ported several games to MorphOS/Mac/Linux at the same time. At that time, I was using MorphOS 1.4 which was very buggy and not very intuitive. While it was nice to be able to run all of my old Amiga apps again, the instability of the OS made it a very troubling task. I still remember the nightmares I had trying to get various ports to build correctly without crashing the system, or editing code changes. Good old days 🙂
After playing around with the Open Firmware (which I am quite sure is horribly out of date) I was able to figure out how to boot the Peg from the CD, and install the OS to the hard drive. It took me a little while to get used to where the different settings were, then I couldn’t figure out why it wouldn’t see the HD, until I realiszed it wasn’t in RDB mode. After that, slapped on a few Amiga partitions and bingo, off it went.
My experience in the short time I have played with the OS is that it is much nicer and cleaner than it used to be. It has come a long way with the new Ambient and other tools. I will take a full play with it and even get it online in the next few days to see just what is out there and available for it. I was very happy to see that they finally included a TCP stack as standard that didn’t have to be registered by itself to use fully. As much as I loved Miami (and did pay for it back in the days of the Amiga), I don’t have my keys anymore and wasn’t able to get Nordic to re-issue them to me.
As much as I would like to start making games for MorphOS again, im not sure if I want to pay the $111 euros to get a license key for something I won’t use all that often, and still not even sure if it’s something thats worth developing for. Based on the price alone, which is a little bit less than buying the new Windows 7 operating system upgrade, i’m sure that there are many people who are still only using the 30 minute restricted version. I have a few games that could be ported, but they will have to wait for a while.
If any MorphOS developers have any free keys they want to give away, feel free to throw one this way 🙂


Recent Comments