Computers
Finally Finished Working On My Amiga A1200
1 I Spent quite a bit of time this weekend working on my Amiga. It has been a few years since I used it for anything other than recording music (for CVGM.net) and thought it was about time I got it working again. For quite a while now I have had the itch to get back into programming on the Amiga, and couldn’t think of a better time. Its also not that often lately that I have a few hours of downtime to actually devote to filling the entire kitchen with old computer stuff 🙂
Over the years as a programmer on the Amiga, I have accumulated a fair amount of Amigas, and also bought a few bits here and there. All my Amiga 1200’s are PAL, and every time I fly home to the UK I always bring one back with me if I can find one. On my trip last year, I was able to find an “Desktop Dynamite” pack for 50 quid, so I threw away a bunch of closes and packed my suitcase with wonderful Amiga goodness instead. The machine I had been using previously had a broken pin on the PCMCIA slot, which seems to be a common thing to break on all my Amiga machines over the years.
The most useful device I ever bought for my Amiga was my Catweasel A1200, it lets me hook up all kinds of drives to the system, and access them natively. In this modification, I will be replacing the built-in floppy with a PC drive. It will prevent me from booting via floppy disk, but the benefits of being able to read Amiga and PC disks while in Workbench are worth it. I also have a Scandy VGA ScanDoubler device thingy that clips over top of some of the chips in the Amiga and lets me connect it directly to a VGA monitor, though I tend to run into a few problems from time to time with it (it might be because my PAL Amiga doesn’t like it, I bought it in the US so it might be NTSC based) such as the screen flickering green or with a tint of blue. For this particular project, I have decided to leave it out of the system and I will put it back in another time. For now, I will settle for my 1084S and a nice Interlaced screen.
The hardest part about working on the Amiga is getting the hard drive working. By default, the Amiga has a size limit of 4gb. I had bought 2 4Gb IBM HD’s online for $1 through Ebay just for this. Now we had to get them working on the Amiga! This is where UAE comes in. One of the nice new features of the newer UAE is the ability to connect Amiga hard drives natively and use them like a real hard drive, instead of the traditional HDF files. It does however still have some problems. It cannot yet (at the time of writing anyways) partition the drive correctly, so all the partition work must be done on the real Amiga. This was a bit of a ballache for me, as I have every Workbench disk except the Install disk (that contained HDToolbox) so I ended up connecting my A2000HD and using an old version from there, just to get the partitions going. From there, I could connect to the drive to the PC and mount it natively.
To begin with, I tried to copy a version of AmiKit to the drive. The copy process went very well, however I ran into a lot of problems getting it to work on the real Amiga. After a few hours of trying to get it to boot, and never reahing the desktop, I decided to take another approach and instead I went with a more simplified Workbench from ClassicWB (http://classicwb.abime.net/) which only required my OS 3.9 CD. The bare basic programs and tools were installed, which was enough to get me started at this point. I added some more games and demos for WHDLoad, and that’s all I really needed. I also took advantage of being online with UAE, and added the newest Catweasel drivers, and a few other tools.
My Amiga has a wireless Netgear card, and I need to use the prism2.device to get it to connect to the network. Once I get moved into my new place next week, I will get that all set up and working. I tried briefly with the Genesis TCP stack and just couldn’t get it to see the card. Nothing like browsing the web on a 16 colour Amiga Interlaced screen! Oh how modern day kids are spoiled!
Detailed Amiga Specs: Commodore Amiga 1200 (PAL, Personally Purchased From the UK), DKB 1240 & 32Mb RAM (030 & 6882 FPU), Catweasel A1200, 4Gb IBM HD, OS 3.9 w/Boing Bag 1 & 2, ClassicWB Image.
Some Pictures Of Beauty:
rfcpool Bitcoin Miner Status Tool Released
0This last couple of weeks I have been working on my Bitcoin Miner status API for rfcpool, and finally got around to releasing the first versions of my status tool, I’m glad I’m getting the hang of bitcoin now, thanks to SoFi. The API itself can do more than monitor the status of one mining pool, and in the future it will connect to multiple pools and display the results together in the same window. Originally, it was started when I began working on an alternative to the GUIMiner application, which I hope to finish one day.

If you are into BitCoin mining, why not check out rfcpool with their no-fee PPLNS payout system and give the app a whirl 🙂
I have set up a dedicated project page for the app, you can find more detailed information about it HERE.
You Cannot Arrest an Idea
0
You cannot arrest an idea. Sail on strong, atopiary.
New Commodore C128 & 1541 Disk Drive \o/
0 About 3 weeks ago I found a new toy online 🙂 Meet my new Commodore 128 & 1541 Disk Drive. Both are in really excellent shape, and the 1541 is pretty much brand new, it doesn’t have a fingerprint on it! At the same time that I got the machine, I also went ahead and bought an XA1541 transfer unit, which connects to a regular PC, or a 1541 Commodore disk drive and acts like the device itself.
If connected to the 1541, the PC can transfer disk images back and forth between the drive, handy for making backups, copying downloaded images back to floppy, so they can be ran on the C128.
Software exists to connect the 1541 directly to the C128, however I wasn’t able to get it to work, so I may have to build a special DOS box in the future and try it again. The software is quite old and might not even work with this particular adapter.
Information on the adapter, and others in the series which can connect to various commodore devices, can be found on the following site: http://sta.c64.org/xa1541.html This is an open design, anyone can freely made it, although I chose to pay a fee and bought mine pre-built as I can’t solder to save my life 🙂
After playing with the new setup, it was very handy for transferring SID files to disk for playing on the real machine. Its funny to me just how used to emulated recordings I became, as the real SID versions quite often sound very different. I will eventually record some of these and put them on CVGM.net.
I plan to use this computer to do a bit of coding in the future as well, so expect a small intro or some other piece of coding poop to come from me soon! Meanwhile, some additional images!
My New Amiga Tattoo!
0 Since about 1998 I have had my eye on a nice Amiga tattoo design that I fell in love with the moment I saw it, and so finally last weekend I went ahead and had it inked onto my left arm. Over the years I had been putting it off for various reasons, cost and what-not. One of my neighbours was having a tattoo party and so I finally decided now was the time to get it done!
The Commodore Amiga has been a major part of my life for many wonderful years. I moved to the Amiga after spending several years coding on the ZX Spectrum. I learned to code C on the Amiga using SAS/C, and a few other languages including AMOS Basic and Blitz Basic. My Amiga is still a big part of my life, I currently have 3 of them in the house as well as a Pegasos II, and I am working on putting one of my A1200 machines into a tower (although its turning out to be a bit on the expensive side).
The tattoo was hand drawn & inked by local tattoo artist Jeff Benedict. The dark colouring on the boing ball and A is shadow and will eventually lighten up as my arm heals. The images represent the various logos use by the Amiga. AMIGAAAHHH!!
Dual-Booting Kubuntu Alongside Windows 7 Without Wubi – Properly!
0 The hard drive took a major dump in my laptop this weekend, left it backing up some stuff while I went to go see Tron, and when I got home it sounded like a DJ was scratching some kind of new rap tune. Needless to say, the drive was on its way out, but luckily I have been able to recover almost all of my data so far 🙂
After installing a replacement hard drive, I thought it was about time that I put a dedicated linux partition on this system as I have been using Kubuntu to do some Android development (installed via Wubi). While Wubi is nice for messing around, it isn’t the most stable system to be using and I have had a couple of disasters in the past with it messing up my virtual partitions. Wubi also has some known bugs, where after installing inside Windows, you’ll get a message about no root filesystem being defined and that you should fix it in the partition manager. Nice, if you can actually get there to do it!
So, I installed Windows 7, left 40gb of free space intentionally for Kubuntu. After the process of doing all the software installs and updates etc. for Windows I thought that I had better take a shot at installing the Linux side of things. Boy, what a mess 🙂 Firstly, there is something about the partition layout in Windows 7 that GPartEd just cannot see them (even using the GPartEd Live CD, or any LiveCD including Kubuntu). It thinks my hard drive is completely unpartitioned. Not what I was expecting, as I was hoping I could just throw some linux partitions into the free space, and then install. Very confusing 🙂 Adding any changes at this point would erase my new Windows 7 partition instantly.
I remember something a friend told me years ago about partitioning, that he had once used Linux to do the partitioning of his drives for some wierd XP install, as the Windows tools at the time were quite shit, so I figured that to get this to work the way I want it, I should probbably attempt something similar. I didnt really have much to lose (besides sitting through a few hundred megs of Windows Updates) so I went ahead and prepared the partition in GPartEd.
An important thing to remember here is the partition table. You must go into the Partition Table section and create a new ms-dos partition table, otherwise if you don’t it may try and use GPT by default (which won’t work with Windows 7). If you try to install Windows 7 without this partition type change, it will pop up a Warning message when you try to select the partition, and clicking Details will tell you that it cannot install on a GPT partition. So, after this step (which will completely zap your entire drive) I proceeded to create an NTFS partition, leaving 40gb free space for Linux later on. After applying the partition changes, booting the Windows 7 installer and installing windows by selecting the NTFS partition I just created, I was then able to reboot with a KUbuntu LiveCD and work with the free space on the drive correctly! It will even mount the Windows partition (just remember to hit Yes on the option to Unmount it duringi the Kubuntu install). Even grub works well and offers Windows 7 as an option in the boot menu.
When installing Linux with manual partitions, remember to add a swap partition at least 2x the size of the available ram in the machine, and the rest can then be an ext4 partition (that mounts to /) and thats the minimal that Kubuntu will need in order to boot correctly. Grub takes care of the rest of the issues with booting and selection etc. as most of Grub resides in the liunux part.
I am sure that several people have had problems trying to get the dual booting to work correctly, so I hope that this helps at least one human being out there who has struggled with this as long as I have.
And So We End 2010 :)
0 With the end of 2010, now is the time after all the wild parties and heavy drinking to look back on the year that just ended 🙂 Overall, I think it was a great year with many of my personal achievements accomplished 🙂
The year began with a very big bang for me as I had started working on Zine at the beginning of the year. Zine was to be my first big contribution to the scene in a very long time, since my Amiga days actually, and I was very excited to be able to travel to Evoke in Germany and see it unveiled, talk to the people who read it, and cook a few sausages for people attending the release party. I got to meet a lot of cool people, a lot of people who I idolized as a spotty nerd teen, and most of my fellow Brainstorm guys. I was also proud to get Bit Arts and Romeo Knight (musicians from the Red Sector Megademo) together in the same room for beers \o/ Lots of beer, tears and laughs were had that weekend 🙂 It was definitely my greatest moment this year and I can’t thank everyone who helped on this project enough! Issue 15 will appear some time soon! [Zine #14 Page | Pouet Link]
The next big personal acheivement for me came with working with Ultrasyd on a last-minute Amstrad CPC project called NOW! I spent most of my early life developing on the Sinclair Spectrum and I had wanted to get back into 8-bit coding for quite some time. The Spectrum & Amstrad are very similar in design. Syd and Fenyx Kell composed the music for the project, and I threw a very basic interface together in about 2-3 weeks to get the release ready for Main party. Boy were we shocked when we scored a 3rd place win! Completely unexpected, as we weren’t really trying to win anything 🙂 Again, the feeling was great to see the video being played on the big screen, and watching people’s reactions. Great job guys 🙂 [NOW! Page | Pouet Link]
Another project I was proud to be involved with this year was the Alien Invasion music disk supported by Nectarine, and coded by maep. This disk took the 4sceners.de award for the best music disk of 2010. Nectarine is a demoscene web radio station, using the Demovibes codebase that I work on with Terrasque (Project Page). Congratulations to everyone involved, especially maep who stayed up late to talk to me, and for working so hard on the project! [Pouet Link]
Unfortunately, I didn’t get to release any new games this year though I have been working on some projects. I have been working a lot on the new Piles’O’Tiles engine, which i’m not sure yet when it will be ready. I have also started working on some Android code, so I am hoping to be bringing some of my games to this exciting platform. The first game released will most likely be Jelly Othelly, but I may change my mind in the future with that and release something else instead, like Piles’O’Tiles.
I am pretty sure I have forgotten to add something epic to this post, so I apologize ahead of time and will keep editing it as time goes on to thank all the great people that helped me this year. It’s time to enjoy a bit of 2011 with a large pint of beer and a compiler!
FishGuy876
Immutable Drives In VirtualBox On Windows
2I have been playing with VirtualBox for the last day or so now, and I am very pleased with the way that it works so far. Feels snappier to me than VMWare did, but maybe thats just me 🙂
One of the more useful features I found in VirtualBox is immutable hard drives. These are drive images that never change, so to speak. Any data that is written is saved to another drive containing only changes, so if you have lots of VM images for many different projects (like I do) you don’t have to install an OS on each of them; Just make a differencing disk and only make it the size of the changed data (such as programs and updates etc.) Brilliant!
It took me a while to figure out how to make an immutable disk on Windows, as the GUI is not very friendly towards this process. You should start by making a new Virtual Machine with the desired OS (I used Windows for the time being) and create a new hard drive image for it. From that VM, proceed to install Windows as you normally would do, activate it and install all your Windows updates and tools you wish shared to your multiple machines. For me, this is mostly just Windows, all the updates, and Altap Salamander.
Once this process was done, I proceeded to delete all temporary files from the system, a bunch of un-necessary Windows files, and ran a defrag on the drive using PerfectDisk to make sure everything was at it’s peak performance.
In order to make the drive immutable, we have to perform several steps to it. Firstly, I compressed the VDI image to make sure the file was as small as possible. While cloning will do this for us as well (described later) I wanted to keep the original image small in case I needed it for something else in the future. VirtualBox is great in that you can control it via the command line. Open a Command Prompt and change the folder that you installed VirtualBox and run the VBoxManage command with the modifyhd command, followed by the VDI file and the compact command:
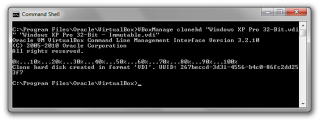
This may take a few minutes to complete, but if the file has lots of empty space in it, that will all disappear after the process is complete. Next, we will make a clone of the disk. Again, I chose to do it this way so I could keep the original for something else in the future. Cloning a drive is very simple to do, using the clonehd command and the filename of the source VDI, and a filename of a target VDI. Cloning is an important step, as VirtualBox won’t allow you to use the same VDI file copied to multiple locations, the cloning process changes the internal drive GUID so that the clone can be added as a seperate drive. In VMWare in the past, i’d have huge VMDK files that I would just copy to a new VM and launch from there, which also resulted in much larger files being used than what was actually necessary. I cloned the drive using the following command:
VBoxManage clonehd "Windows XP Pro 32-Bit.vdi" "Windows XP Pro 32-Bit - Immutable.vdi"
Which will produce a new VDI file that we will use with our future VM’s:
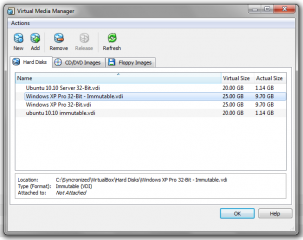
If you go back to the Media Manager in VirtualBox, click on Add and add the newly created VDI file to the list of volumes. Everything should match except for the name. The next step is to mark this as an immutable drive, so VirtualBox recognizes it as such. This is done with the modifyhd tag as follows:
VBoxManage modifyhd "Windows XP Pro 32-Bit - Immutable.vdi" --type immutable
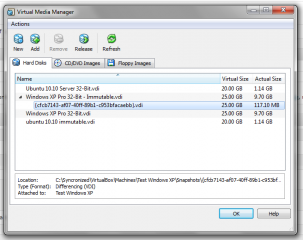
And if you refresh your Media Manager folder, you will see that the drive type is now set to immutable:
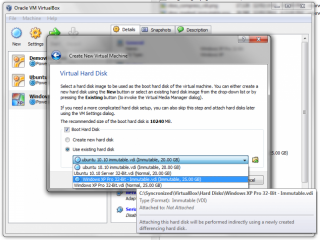
So, now that we have an immutable drive we should probably try and use it 🙂 To do this, simply go back to the VM management and create a new Virtual Machine for Windows as you did before. Now when you get to the part where it asks about the Hard Drive, choose an existing drive and select the Immutable image, You will notice that it has a blue spot next to it, signifying that it’s immutable:
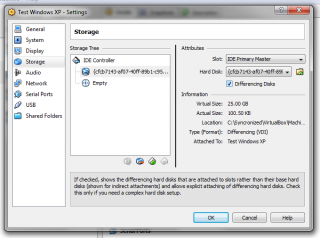
After the VM is created, click Settings and go to Storage, select the Immutable drive and place a checkmark in the box for differencing. This will cause a new hard disk name to appear. Click OK to accept the changes, then launch the VM. It will boot to the same way as it did before, except its not using the old image. Make sure it boots OK then go ahead and shut down the VM so we can make some changes.
Some Notes About Differencing
Typically, drives that use differencing disks will “forget” the changes made to them once the VM is restarted. This is the case here by default, once you boot with a differencing disk, any changes made will be lost when it shuts down. This protects the original disk, and prevents anything from changing in it. Its always easy to see which VM’s use immutable drives, if you go to the Media Manager there will be an expandable arrow next to the main drive, which contains all the differencing disks from the various VM’s that use that specific immutable drive.
Differencing disks can be changed to allow them to retain their changes after the VM shuts down. In the console, simply run the following command (exchanging the GUID for the one found in your media manager) :
VBoxManage modifyhd cfcb7143-af07-40ff-89b1-c953bfacaebb --autoreset off
The filename should match the GUID and is located in the Virtual Machines folder/{Machine Name}/Snapshots folder. Mine is {cfcb7143-af07-40ff-89b1-c953bfacaebb}.vdi respectively.
After that, any changes written to the disk will remain permanent! I hope this helps someone out there with a similar situation, and that this helps then understand it a little better 🙂
Recent Experiences With VirtualBox – Better Than VMWare :)
0I would like to thank my friend bpoint for getting me into using VirtualBox instead of VMWare, I am already finding it far more useful and saved considerable amounts of disk space 🙂
VirtualBox is a virtual machine system that allows you to install additional OS’es into virtual machines, including Windows, Linux, and even Mac!
Im sure I will blog about it more when I learn how to use it properly and all that good stuff 🙂


Recent Comments